【Locofy MCP + Cursor】Figma からReact コンポーネントに変換
こんにちは、 Gaji-Labo フロントエンドエンジニアの石垣 (@semigura) です。
AI駆動開発の話題が盛り上がっていますが、Gaji-LaboでもAIを活用したスタートアップのプロダクト開発支援を行うために、AIタスクフォースを組成し模索しています。
今回の記事では Figma で作成したデザインを React コンポーネントにボタン1つで変換できるツール「Locofy.ai」とAI搭載エディタ「Cursor」(モデルには Claude 3.7 Sonnet を利用)を組み合わせ、コンポーネント開発を加速させる方法を検証してみました。
0. プロジェクトの基礎となる環境構築
今回の検証で使うための環境構築として、基礎となる Next.js プロジェクトを作成します。ここでは一般的な create-next-app@latest を使いました。
npx create-next-app@latest my-locofy-project
cd my-locofy-project
1. Locofy.ai のアカウントを作成する
複数の料金プランがありますが、今回は Starter プランを選択しました。
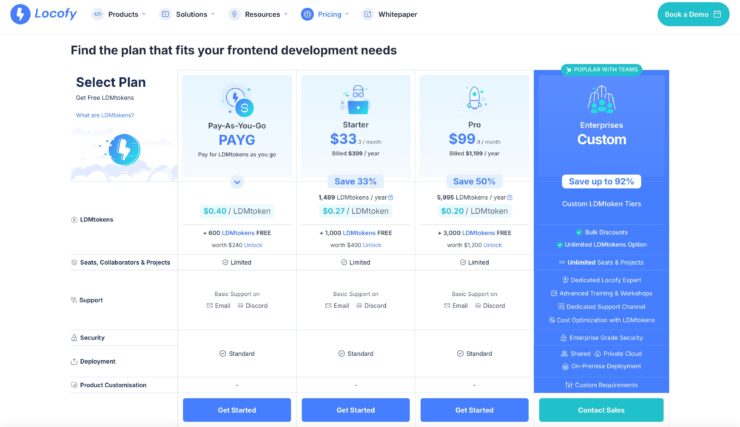
Starter, Pro プランを選択した場合は1ヶ月に一定のトークン(Starter であれば 1,489 LDMtokens)が付与され、コード生成時に出力量に応じてトークンが消費されます。トークンが尽きた場合、自動的に補充はされないようです。
料金表上では月額換算の料金が表示されていますが、記事執筆時点(2025年5月現在)では年額での支払いのみとなっています。
PAYG(使用トークンに応じて料金が発生する)プラン以外では支払いした後にLDMtokensが付与されて初めて使えるようになりますので、
- 初期費用がかかる
- プロジェクトの規模によってプランの選択を見極める必要がある
以上2点は留意が必要だと思いました。
2. Locofy.ai を使って Figma 上の特定コンポーネントを生成する
アカウント作成後はLocofy.ai ダッシュボード上でワークグループを作成します。
その後、Figma プラグインをインストールした上で生成したい対象のFigma ファイルを開き、プラグインを起動します。今回は Gaji-Labo コーポレートサイトのデザインを基に作業します。
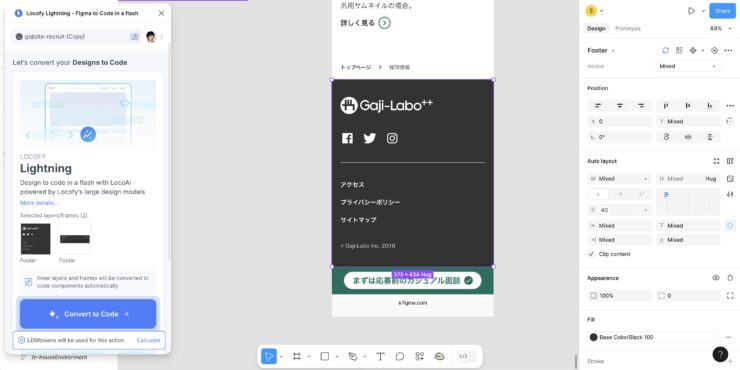
起動後、フレーム内の生成したいコンポーネントを選択するとプラグインウィンドウ内に Convert to Code ボタンが表示されます。
こちらを押下後、消費されるトークンが計算され、確認ボタンを押すとコンポーネントのコードが自動生成されます。
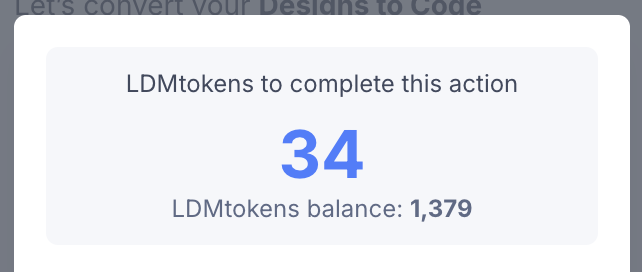
今回の生成では34トークンを消費しました。こちらは選択したコンポーネントに含まれているすべてのレイヤーから計算されているようです。参考:What are LDMtokens & how do they work
コンポーネントによって消費量は変わりますが、単純計算では Starter プランだと43コンポーネントで消費しきることになります。
留意点
フレーム全体を選択してページ全体を生成することもできますが、ここではコンポーネント単位でのコード生成としました。
理由は
- 出力量に応じてトークンが消費されるため、1ページすべてを生成するとトークン量が嵩むため
- 一挙にコードを出力すると人力でのレビューコストも嵩むため、コンポーネント単位で生成したほうが手を入れやすい
以上の2点からです。
また、出力されるコードのコンポーネント粒度や命名はFigma 上のデータ基準になるので、正しく設定されている必要があります。
参考: Figma to Code: Design Best Practices

生成されたコードとプレビューはプラグインウィンドウで確認できます。
この画面から直接 GitHub に反映したり、Locofy Builder という編集画面で詳細に出力コードをカスタマイズすることもできるのですが、今回はここから Cursor に作業を引き渡し、この出力したフッターコンポーネントを Agent の手で改修していきます。
3. Cursor に Locofy MCP を設定
Locofy MCP の設定方法は公式 https://www.locofy.ai/docs/export-and-deployment/locofy-mcp/ が解説しているのでそちらを参照ください。.cursor フォルダに mcp.json を追加して設定できます。
4. Cursor で Pull footer component from Locofy を実行
Cursor のチャット画面に移り、以下を入力します。
LocofyからFooterコンポーネントをpullしてきてください。
そして既存の App Router 構成にあわせ最適化し、ページで表示できるようにしてください。
実行すると、先程 Locofy で出力した Footer コンポーネントがプロジェクトに取り込まれます。その上で「optimize to App router」の指示により、App Router に最適化されたコードに改修され、create-next-app で生成される layout.tsx に追加されます。
今回の出力では「Footer」の他、「Border」「AssetsfooterTextLink」の2つが生成されていたので3コンポーネントがプロジェクトに追加されました。
4. 要件に沿うように Cursor で出力物を修正
Locofyの生成コードをプロジェクトの要件に合わせて調整します。
実際にFooterコンポーネントを最適化した例を紹介します。
取り込まれた初期コード
import { FunctionComponent, useMemo, type CSSProperties } from 'react';
import Border from "./Border";
import AssetsfooterTextLink from "./AssetsfooterTextLink";
import Image from "next/image";

export type FooterType = {
  className?: string;
  gajiLabo?: string;

  /** Variant props */
  device?: "desktop" | "mobile";

  /** Style props */
  footerWidth?: CSSProperties['width'];
  footerPosition?: CSSProperties['position'];
  footerTop?: CSSProperties['top'];
  footerLeft?: CSSProperties['left'];
}

const Footer: FunctionComponent<FooterType> = ({
  className="",
  device="desktop",
  footerWidth,
  gajiLabo="/gaji-labo.png",
  footerPosition,
  footerTop,
  footerLeft
}) => {
  const footerStyle: CSSProperties = useMemo(() => {
    return {
      width: footerWidth,
      position: footerPosition,
      top: footerTop,
      left: footerLeft
    };
  }, [footerWidth, footerPosition, footerTop, footerLeft]);

  return (
    <section className={`w-full max-w-[1440px] bg-semantic-text-black overflow-hidden flex flex-col items-start justify-start py-spacing-x-large px-spacing-xxx-large box-border gap-spacing-large text-left text-font-size-m text-semantic-text-white font-body-regular-bold data-[device='mobile']:py-10 data-[device='mobile']:px-5 data-[device='mobile']:z-[10] [&_.layout20]:data-[device='mobile']:flex-col [&_.layout20]:data-[device='mobile']:items-start [&_.layout20]:data-[device='mobile']:justify-start [&_.layout20]:data-[device='mobile']:gap-spacing-large [&_.sns]:data-[device='mobile']:gap-5 [&_.footermenu]:data-[device='mobile']:gap-5 ${className}`} data-device={device} style={footerStyle}>
      <div className="layout20 self-stretch flex flex-row items-center justify-between gap-0">
        <Image
          className="h-10 w-[214px] relative object-cover"
          src={gajiLabo}
          alt="Gaji Labo Logo"
          width={214}
          height={40}
        />
        <div className="sns flex flex-row items-start justify-start gap-spacing-large">
          <Image className="h-8 w-8 relative object-cover" width={32} height={32} src="/socialfacebook.png" alt="Facebook" />
          <Image className="h-8 w-8 relative object-cover" width={32} height={32} src="/socialtwitter.png" alt="Twitter" />
          <Image className="h-8 w-8 relative object-cover" width={32} height={32} src="/socialinstagram.png" alt="Instagram" />
        </div>
      </div>
      <Border device="desktop" />
      <div className="footermenu overflow-hidden flex flex-col items-start justify-center gap-spacing-small">
        <AssetsfooterTextLink state="default" linkLabel="アクセス" />
        <AssetsfooterTextLink state="default" linkLabel="プライバシーポリシー" />
        <AssetsfooterTextLink state="default" linkLabel="サイトマップ" />
      </div>
      <div className="relative text-font-size-s leading-[18px] text-right">© Gaji-Labo Inc. 2016</div>
    </section>
  );
};
上記のコンポーネントに対して以下の指示を行いました。
以下の要件を達成してください
- Footer コンポーネントに props は不要なので削除し、固定値とする
- 画像パスが undefined になっており表示されないので public を見て正しいパスはなにかを確認し修正する
- Border, AssetsfooterTextLink はコンポーネントにする必要がないので削除し Footer.tsx 内に記述する
- PC/SPのレスポンシブスタイル切り替えを 768px 前後で行う
最適化後のコード
import { FunctionComponent } from 'react';
import Image from "next/image";
const Footer: FunctionComponent = () => {
return (
<section className="w-full max-w-[1440px] mx-auto bg-semantic-text-black overflow-hidden flex flex-col items-start justify-start py-spacing-x-large px-spacing-xxx-large box-border gap-spacing-large text-left text-font-size-m text-semantic-text-white font-body-regular-bold md:py-spacing-x-large md:px-spacing-xxx-large max-md:py-10 max-md:px-5 max-md:z-[10]">
<div className="self-stretch flex flex-row items-center justify-between gap-0 max-md:flex-col max-md:items-start max-md:justify-start max-md:gap-spacing-large">
<Image
className="h-10 w-[214px] relative object-cover"
src="/gajilabo-1@2x.png"
alt="Gaji Labo Logo"
width={214}
height={40}
/>
<div className="flex flex-row items-start justify-start gap-spacing-large max-md:gap-5">
<Image className="h-8 w-8 relative object-cover" width={32} height={32} src="/socialfacebook@2x.png" alt="Facebook" />
<Image className="h-8 w-8 relative object-cover" width={32} height={32} src="/socialtwitter@2x.png" alt="Twitter" />
<Image className="h-8 w-8 relative object-cover" width={32} height={32} src="/socialinstagram@2x.png" alt="Instagram" />
</div>
</div>
{/* ボーダー(以前は個別コンポーネント) */}
<div className="self-stretch relative h-px">
<div className="absolute h-full w-full top-[0%] right-[0%] bottom-[0%] left-[0%] bg-base-color-black-030" />
</div>
{/* フッターメニュー */}
<div className="overflow-hidden flex flex-col items-start justify-center gap-spacing-small max-md:gap-5">
<div className="flex flex-row items-center justify-start text-left text-font-size-m text-semantic-text-white font-body-regular-bold">
<div className="relative leading-[21px]">アクセス</div>
</div>
<div className="flex flex-row items-center justify-start text-left text-font-size-m text-semantic-text-white font-body-regular-bold">
<div className="relative leading-[21px]">プライバシーポリシー</div>
</div>
<div className="flex flex-row items-center justify-start text-left text-font-size-m text-semantic-text-white font-body-regular-bold">
<div className="relative leading-[21px]">サイトマップ</div>
</div>
</div>
<div className="relative text-font-size-s leading-[18px] text-right">© Gaji-Labo Inc. 2016</div>
</section>
);
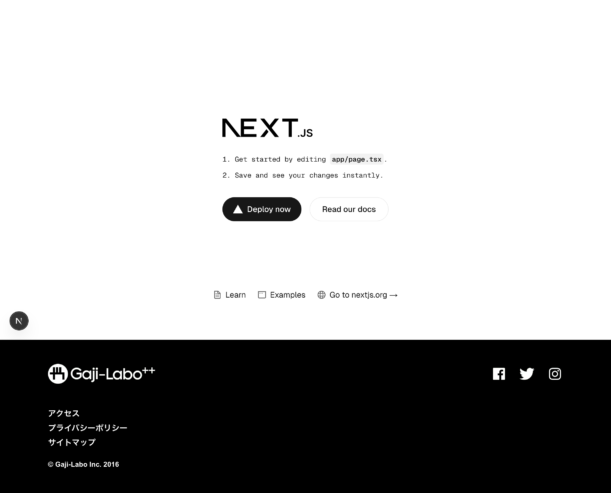
};プロンプトを通すことでより実プロジェクトで使えるコードに近づきました。
layout.tsx に追加されているため、開発環境を立ち上げるとページで確認できます。
さらにプロンプトを重ねて品質を高めたり、使用したプロンプトを Cursor Rules に設定して再利用性を高めることができます。また、ここから Storybook やテストファイルの生成も可能です。
AI駆動開発でコンポーネント開発を効率化
Figma、Locofy.ai、Cursor の組み合わせは、モダンなフロントエンド開発の効率を大幅に向上させます。特にコンポーネント実装作業は繰り返し作業になりやすいため、効率化することでフロントエンドエンジニアが集中すべきことに注力できるようになると思います。
支援先スタートアップのプロダクト開発がより効率化できるよう、よりAI駆動開発を研究していこうと思います。
Gaji-Labo は Next.js, React, TypeScript 開発の実績と知見があります
フロントエンド開発の専門家である私たちが御社の開発チームに入ることで、バックエンドも含めた全体の開発効率が上がります。
「既存のサイトを Next.js に移行したい」
「人手が足りず信頼できるエンジニアを探している」
「自分たちで手を付けてみたがいまいち上手くいかない」
フロントエンド開発に関わるお困りごとがあれば、まずは一度お気軽に Gaji-Labo にご相談ください。
オンラインでのヒアリングとフルリモートでのプロセス支援にも対応しています。
Next.js, React, TypeScript の相談をする!Gaji-Labo Culture Deck
Gaji-Labo フロントエンドエンジニア向けご案内資料
Gaji-Labo は Next.js, React, TypeScript 開発の実績と知見があります
フロントエンド開発の専門家である私たちが御社の開発チームに入ることで、バックエンドも含めた全体の開発効率が上がります。
「既存のサイトを Next.js に移行したい」
「人手が足りず信頼できるエンジニアを探している」
「自分たちで手を付けてみたがいまいち上手くいかない」
フロントエンド開発に関わるお困りごとがあれば、まずは一度お気軽に Gaji-Labo にご相談ください。
オンラインでのヒアリングとフルリモートでのプロセス支援にも対応しています。
Next.js, React, TypeScript の相談をする!