WordPressをヘッドレス CMS 化!Next.jsで構築するブログサイトの始め方!
こんにちは、Gaji-Labo フロントエンドエンジニアのたにもとです。
WordPress をヘッドレス CMS として活用できることを知り、WordPress をヘッドレス化して動作する Next.js の環境構築してみました!
WordPress のヘッドレス CMS化をするメリットは?
WordPressは執筆者をサポートする機能も豊富で、ヘッドレス CMS として使うメリットに「ユーザーの執筆体験」があります。
他のヘッドレス CMS と比べて多くのユーザーが慣れ親しんだ管理画面が使えることは、導入・利用のハードルは低いのではないでしょうか。
また、WordPress にデータの管理を任せると…
- WordPress を本体サーバーから隔離することでセキュリティリスクの対策になる
- データはそのままで、フロントエンドだけリプレイスすることが可能
- コンテンツを JSON 形式で取得できるので、モバイルアプリなどデータを一元提供できる
などのメリットもあります。
ただ、API 設計や認証管理など初期構築のコストが高さやプラグインの利用が難しいケースなど課題がありますので、他 CMS 同様に十分検討した上で技術選定する必要があります。
WordPress をヘッドレス CMS として運用したいケースって?
CMS 全般に入れることですが、コンテンツをフロントエンドのコードとは別で管理したい場合かと思います。
具体的には、
- 一部ディレクトリを社内ブログとして運用し、コンテンツは CMS で管理したい
- 会社からのお知らせ等のコンテンツは、エンジニア以外が対応するため CMS で更新が簡単に行えるようにしたい
などです。
サイトの一部をヘッドレス CMS で管理することでコンテンツの更新性を担保し、メディアの安定的運用に繋げることが可能だと考えます。
そして今回は「サイトの一部ディレクトリを CMS で管理して投稿した内容を表示したい」ケースを想定し、WordPress のサンプル記事を表示するまでを記事にしたいと思います!
環境を構築する主要なライブラリ等のバージョン
環境を構成する主要なライブラリ等のバージョンは下記の通りです!
| 名称 | バージョン |
|---|---|
| Next.js | 15.3.2 |
| React | 19.0.0 |
| WordPress | 6.4.3 |
| MySQL | 8.0 |
WordPress 動作環境の構築
Docker を使用してWordPress 環境を構築しました。
以下の docker-compose.yml を作成します。
services:
# WordPress
wordpress:
image: wordpress:latest
ports:
- "8000:80"
environment:
WORDPRESS_DB_HOST: db
WORDPRESS_DB_USER: wordpress
WORDPRESS_DB_PASSWORD: wordpress
WORDPRESS_DB_NAME: wordpress
WORDPRESS_DEBUG: 1
WORDPRESS_CONFIG_EXTRA: |
define('WP_DEBUG', true);
define('WP_DEBUG_LOG', true);
define('WP_DEBUG_DISPLAY', false);
define('REST_API_ENABLED', true);
volumes:
- ./wordpress:/var/www/html
depends_on:
- db
# MySQL
db:
image: mysql:8.0
platform: linux/arm64/v8
environment:
MYSQL_DATABASE: wordpress
MYSQL_USER: wordpress
MYSQL_PASSWORD: wordpress
MYSQL_ROOT_PASSWORD: somewordpress
volumes:
- db_data:/var/lib/mysql
volumes:
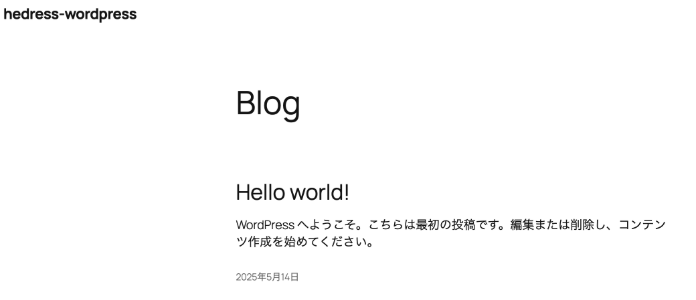
db_data: docker compose up -d を実行し、localhost:8000 で表示されるか確認してください。
WordPress REST API の有効化
WordPress REST API はバージョン4.7からコア機能として備わっております。
もしかしたら修正する必要がないかもしれませんが、wp-config.php に以下の設定があるか確認します。
REST APIの設定
// REST APIの有効化
define('REST_API_ENABLED', true);

// デバッグモードの設定(開発環境用)
define('WP_DEBUG', true);
define('WP_DEBUG_LOG', true);
define('WP_DEBUG_DISPLAY', false);

// CORSの設定
define('WP_CORS_ALLOWED_ORIGINS', 'http://localhost:3000'); // Next.jsの開発サーバーのURL
パーマリンクの設定
「設定」→「パーマリンク」→「投稿名」を選択→「変更を保存」をクリック
REST APIの動作確認
curl を利用するか、URL に接続するかで動作を確認します。
# 投稿一覧の取得
curl http://localhost:8000/wp-json/wp/v2/posts

# 特定の投稿の取得
curl http://localhost:8000/wp-json/wp/v2/posts/1
正しく動作していれば下記のような json が返ってきます。
例)http://localhost:8000/wp-json/wp/v2/posts

[{"id":1,"date":"2025-05-14T08:44:50","date_gmt":"2025-05-13T23:44:50","guid":{"rendered":"http:\/\/localhost:8000\/?p=1"},"modified":"2025-05-14T08:44:50","modified_gmt":"2025-05-13T23:44:50","slug":"hello-world","status":"publish","type":"post","link":"http:\/\/localhost:8000\/hello-world\/","title":{"rendered":"Hello world!"},"content":{"rendered":"\n<p>WordPress \u3078\u3088\u3046\u3053\u305d\u3002\u3053\u3061\u3089\u306f\u6700\u521d\u306e\u6295\u7a3f\u3067\u3059\u3002\u7de8\u96c6\u307e\u305f\u306f\u524a\u9664\u3057\u3001\u30b3\u30f3\u30c6\u30f3\u30c4\u4f5c\u6210\u3092\u59cb\u3081\u3066\u304f\u3060\u3055\u3044\u3002<\/p>\n","protected":false},"excerpt":{"rendered":"<p>WordPress \u3078\u3088\u3046\u3053\u305d\u3002\u3053\u3061\u3089\u306f\u6700\u521d\u306e\u6295\u7a3f\u3067\u3059\u3002\u7de8\u96c6\u307e\u305f\u306f\u524a\u9664\u3057\u3001\u30b3\u30f3\u30c6\u30f3\u30c4\u4f5c\u6210\u3092\u59cb\u3081\u3066\u304f\u3060\u3055\u3044\u3002<\/p>\n","protected":false},"author":1,"featured_media":0,"comment_status":"open","ping_status":"open","sticky":false,"template":"","format":"standard","meta":{"footnotes":""},"categories":[1],"tags":[],"class_list":["post-1","post","type-post","status-publish","format-standard","hentry","category-uncategorized"],"_links":{"self":[{"href":"http:\/\/localhost:8000\/wp-json\/wp\/v2\/posts\/1","targetHints":{"allow":["GET"]}}],"collection":[{"href":"http:\/\/localhost:8000\/wp-json\/wp\/v2\/posts"}],"about":[{"href":"http:\/\/localhost:8000\/wp-json\/wp\/v2\/types\/post"}],"author":[{"embeddable":true,"href":"http:\/\/localhost:8000\/wp-json\/wp\/v2\/users\/1"}],"replies":[{"embeddable":true,"href":"http:\/\/localhost:8000\/wp-json\/wp\/v2\/comments?post=1"}],"version-history":[{"count":0,"href":"http:\/\/localhost:8000\/wp-json\/wp\/v2\/posts\/1\/revisions"}],"wp:attachment":[{"href":"http:\/\/localhost:8000\/wp-json\/wp\/v2\/media?parent=1"}],"wp:term":[{"taxonomy":"category","embeddable":true,"href":"http:\/\/localhost:8000\/wp-json\/wp\/v2\/categories?post=1"},{"taxonomy":"post_tag","embeddable":true,"href":"http:\/\/localhost:8000\/wp-json\/wp\/v2\/tags?post=1"}],"curies":[{"name":"wp","href":"https:\/\/api.w.org\/{rel}","templated":true}]}}]
本番運用では認証用のトークンを作成すべきですが、今回は作業簡略化の観点で認証用トークンを作成せずに進めます。
Next.js アプリケーション側の環境構築
create-next-app を利用して Next.js の環境を作成していきます。
npx create-next-app@latest frontend --typescript --tailwind --eslintpackage.json は以下のような構成にしました。
{
  "name": "frontend",
  "version": "0.1.0",
  "private": true,
  "scripts": {
    "dev": "next dev --turbopack",
    "build": "next build",
    "start": "next start",
    "lint": "next lint"
  },
  "dependencies": {
    "axios": "^1.9.0",
    "date-fns": "^4.1.0",
    "next": "15.3.2",
    "react": "^19.0.0",
    "react-dom": "^19.0.0"
  },
  "devDependencies": {
    "@eslint/eslintrc": "^3",
    "@tailwindcss/postcss": "^4",
    "@types/node": "^20",
    "@types/react": "^19",
    "@types/react-dom": "^19",
    "eslint": "^9",
    "eslint-config-next": "15.3.2",
	"tailwindcss": "^3.4.1",
	"typescript": "^5.4.2"
  }
}
一通りインストールし終わったら npm run dev を実行して localhost:3000 に接続してページが表示されるか確認してください。
※ npm のコマンドを記載していますが、pnpm や yarn を環境に合わせてご利用ください。
WordPress REST API を利用するための準備
型定義
src/types/wordpress.ts を作成し、型定義を作成します。
export interface WordPressPost {
  id: number;
  date: string;
  title: {
    rendered: string;
  };
  content: {
    rendered: string;
  };
  excerpt: {
    rendered: string;
  };
  _embedded?: {
    'wp:featuredmedia'?: Array<{
      source_url: string;
    }>;
  };
}
API クライアント
src/lib/wordpress.ts にAPIクライアントを作成します。
import axios from 'axios';
import { WordPressPost } from '@/types/wordpress';

const WORDPRESS_API_URL = 'http://localhost:8000/wp-json/wp/v2';

export const getPosts = async (): Promise<WordPressPost[]> => {

  const response = await axios.get(`${WORDPRESS_API_URL}/posts`, {
    params: {
      _embed: true,
      per_page: 10,
    },
  });

  return response.data;
};

export const getPost = async (id: number): Promise<WordPressPost> => {
  const response = await axios.get(`${WORDPRESS_API_URL}/posts/${id}`, {
    params: {
      _embed: true,
    },
  });

  return response.data;
};
ブログ一覧ページの実装
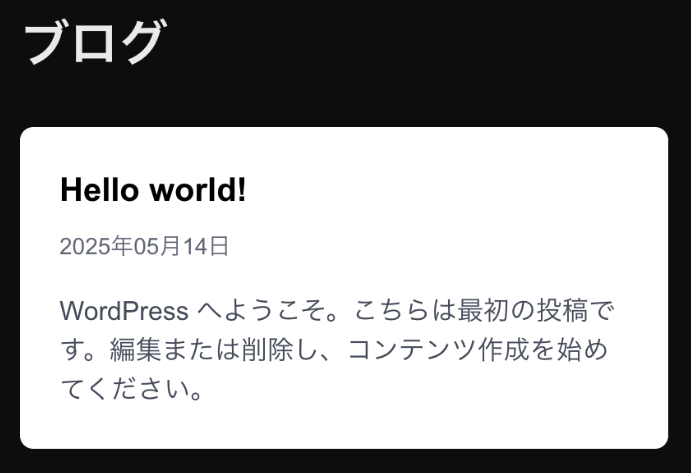
src/app/blog/page.tsx にブログ一覧ページを実装します。
import { format } from "date-fns";
import { ja } from "date-fns/locale";
import Link from "next/link";

import { getPosts } from "@/lib/wordpress";

export default async function BlogPage() {
  const posts = await getPosts();

  return (
    <div className="container mx-auto px-4 py-8">
      <h1 className="text-3xl mb-8 font-bold">ブログ</h1>

      <div className="md:grid-cols-2 lg:grid-cols-3 grid gap-8">
        {posts.map((post) => (
          <article
            key={post.id}
            className="bg-white rounded-lg shadow-md overflow-hidden"
          >
            {post._embedded?.["wp:featuredmedia"]?.[0]?.source_url && (
              <img
                src={post._embedded["wp:featuredmedia"][0].source_url}
                alt={post.title.rendered}
                className="h-48 w-full object-cover"
              />
            )}

            <div className="p-6">
              <h2 className="text-xl font-semibold mb-2">
                <Link href={`/blog/${post.id}`} className="hover:text-blue-600 text-black">
                  {post.title.rendered}
                </Link>
              </h2>

              <time className="text-sm text-gray-500">
                {format(new Date(post.date), "yyyy年MM月dd日", { locale: ja })}
              </time>

              <div
                className="mt-4 line-clamp-3 text-gray-600"
                dangerouslySetInnerHTML={{ __html: post.excerpt.rendered }}
              />
            </div>
          </article>
        ))}
      </div>
    </div>
  );
}
http://localhost:3000/blog に接続するとWordPress がサンプルで作成している記事が表示されます。
個別ページの表示設定
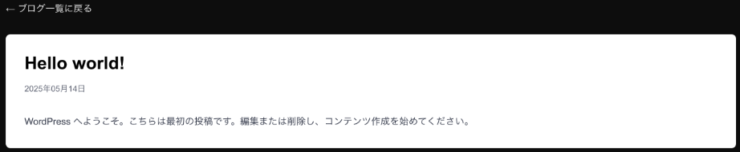
最後に src/app/blog/[id]/page.tsx へ個別ページが表示されるようにページを追加します。
import React from "react";
import { getPost } from "@/lib/wordpress";
import { format } from "date-fns";
import { ja } from "date-fns/locale";
import Link from "next/link";
import Image from "next/image";

export default async function BlogPostPage({
  params,
}: {
  params: { id: string };
}) {
  const post = await getPost(parseInt(params.id));

  return (
    <div className="container mx-auto px-4 py-8">
      <Link
        href="/blog"
        className="text-blue-600 hover:underline mb-8 inline-block"
      >
        ← ブログ一覧に戻る
      </Link>
      <article className="bg-white rounded-lg shadow-md overflow-hidden">
        {post._embedded?.["wp:featuredmedia"]?.[0]?.source_url && (
          <Image
            src={post._embedded["wp:featuredmedia"][0].source_url}
            alt={post.title.rendered}
            width={1200}
            height={600}
            className="w-full h-64 object-cover"
          />
        )}
        <div className="p-8">
          <h1 className="text-3xl font-bold mb-4">{post.title.rendered}</h1>
          <time className="text-gray-500 text-sm block mb-8">
            {format(new Date(post.date), "yyyy年MM月dd日", { locale: ja })}
          </time>
          <div
            className="prose max-w-none"
            dangerouslySetInnerHTML={{ __html: post.content.rendered }}
          />
        </div>
      </article>
    </div>
  );
}
http://localhost:3000/blog/1 に接続すると記事詳細が確認できます。
まとめ
昨今 ヘッドレス CMS を選ぶ時に様々な選択肢があります。
WordPress が ヘッドレス CMS として活用できればその選択の幅も広がるのではないかと考えています。
今回はゼロから新しい環境をローカルで作成したので難易度は低いです。
実運用している環境で実施しようとすると一筋縄ではいかないことが予測できます。
実運用も考えるとCMSの技術選定はとても難しいです。
Gaji-Labo は事業やチームのメリットを一緒に考えた CMS の設計・構築ができるメンバーも在籍しています。もしお悩みの方がいたら、ぜひ一度ご相談ください!
Gaji-Labo は Next.js, React, TypeScript 開発の実績と知見があります
フロントエンド開発の専門家である私たちが御社の開発チームに入ることで、バックエンドも含めた全体の開発効率が上がります。
「既存のサイトを Next.js に移行したい」
「人手が足りず信頼できるエンジニアを探している」
「自分たちで手を付けてみたがいまいち上手くいかない」
フロントエンド開発に関わるお困りごとがあれば、まずは一度お気軽に Gaji-Labo にご相談ください。
オンラインでのヒアリングとフルリモートでのプロセス支援にも対応しています。
Next.js, React, TypeScript の相談をする!Gaji-Labo Culture Deck
Gaji-Laboでは、 Next.js 経験が豊富なフロントエンドエンジニアを募集しています
弊社では Next.js の知見で事業作りに貢献したいフロントエンドエンジニアを募集しています。大きな制作会社や事業会社とはひと味もふた味も違う Gaji-Labo を味わいに来ませんか?
Next.js の設計・実装を得意とするフロントエンドエンジニア募集要項
もちろん、一緒にお仕事をしてくださるパートナーさんも随時募集中です。まずはお気軽に声をかけてください。お仕事お問い合わせや採用への応募、共に大歓迎です!